*Not suitable for people under the age of 18.
The beaut thing about this project is how easily it can be tailored to your tastes. A Scotch connoisseur might design a place for their favourite bottle. Someone right into their rum and coke could include a slot for a few cans. In this case, we’re going for the “party can” with a selection of three favourites.
Keen? Here are the materials you’ll need:
- A steel jerry can
- A block of foam large enough to fit snugly inside
- Three metres of small PVC pinchweld
- A case latch, just about any style will suit
- Two small hinges
- Pop rivets
- Masking tape
- Marker pen
- Every item you wish to house inside the finished bar
And the tools you’ll need:
- Measuring tape
- Ruler or straight edge
- Angle grinder with cutting disc
- Jigsaw or air body saw
- Drill and drill bits
- Rivet gun
- Utility knife, the type with snap off blades
- An electric carving knife (so handy, bear with me!)
- Side cutters
Okay, got all that together? Let us start by marking out a door.
It’s more than worth pointing out that we’re using a brand new jerry can here for a reason. Even an ancient can which hasn’t been used in years could contain residue that could blow the can wide open when the angle grinder touches it.
Now, back to the fun stuff. I like to begin by running masking tape roughly along the areas I’m going to cut. Then you can go over and mark your measurements on the tape, which can be torn off if you make mistakes.
The area of the cut is up to you, but the larger you make it; the more accessible the goods inside will be. Have a think about mounting the hinges and latch at this point. The best way to accommodate these is to extend you door over to the sides of the jerry can. This way there is plenty of space to attach the latch and hinges without making the door too small.
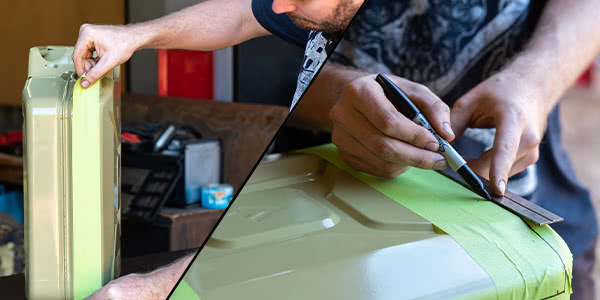
A top tip for measuring is to use your workbench as a reliable reference for measurements. Just stand the jerry can up, and measure from the workbench surface up to mark the bottom cut line on your jerry can. Do the same for the cut at the top, dotting the measurement along the jerry can.
Then join your measurement dots together using a straight edge.
Use the same technique down the sides of your jerry can, the join seam here is an excellent base to take your measurement from. Now you’ve got a perfect rectangle marked out. The problem is, pinch weld doesn’t work so well on tight corners. To round them off, mark 20mm up from each corner, and draw a curve in. Freehand works fine.
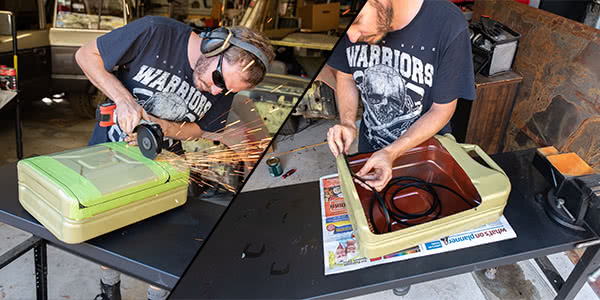
Now it’s time to cut!
With a nice thin cutting disc in your angle grinder, and some eye and hearing protection in place; follow all your straight cut lines. Finish off the corners with your jigsaw or air body saw.
If you purchased the smallest pinch weld you could find, your door should be ready for mounting. If the fit isn’t quite right, you may need to shave a couple of millimetres off all the way around your door panel.
Fit the pinch weld all the way around the cut in your jerry can, and your new door piece. You should use just about all of the three metre length.
Fitting the hinges and latch
These will mount just down the sides of your jerry can, but you’ll have to cut a few small sections out of your pinch weld. One at a time hold each part in place while you mark the sections of pinch weld to be trimmed. Then just pull that section of pinch weld away and cut it with side cutters.
Now each hinge and latch will sit snug between the pinch weld, and you can mark and drill the holes. Pop rivets are the best way to fix these as they are neat and flush with no sharp edges. At this point you have a fully functioning door!
Now, let’s deck out the inside
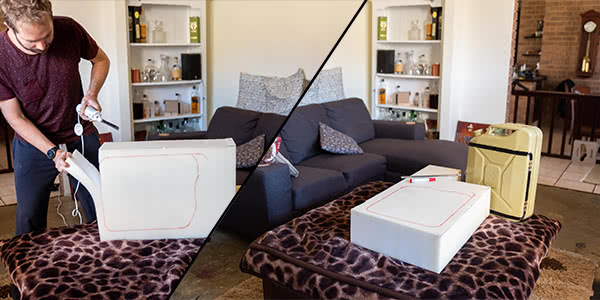
Begin by laying the jerry can on your piece of foam. Two pieces of foam stacked together will work too, if you can find a way to stick them together while you cut the shape.
Trace around the jerry can with a marker. You don’t have to follow the contours around the top of the can, you’ll just trim it large enough to fit snug inside your cutout.
Use your electric carving knife to trim the foam. This thing glides through foam easier than your Sunday roast, and leaves a beautiful clean cut. Once that’s done, squeeze it into your jerry can for a test fit. Tight is good, but if it’s too tight you will run into problems with your individual cut outs in the next step; so don’t be afraid to trim a little more off.
Right, so the foam fits but how do I trim individual spaces for my drinks?
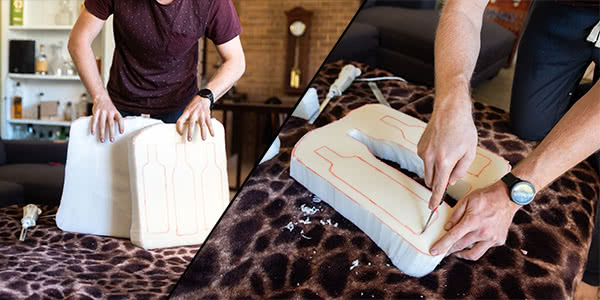
Again, simple tracing does the trick. Lay out each item and trace around them with the marker. Try and leave at least a 20mm space between each to retain some strength in the foam.
You only want these cut outs to be deep enough to recess your beverages into. If you’ve got two layers of foam, you’ve got it easy; just make the cuts in your top piece! If you’re using a single piece, the best way to proceed is measure the depth of your deepest item, remove the foam; and mark this measurement around the sides. Then just go around with the carving knife to trim it in half. It may not look pretty, but you won’t see that part anyway.
The bottom part can go straight back in the jerry can. The top part is where you’ll trim out the shapes you marked with the utility knife. This is where the snap off blade utility knife is handy. At full blade extension, it should reach right through the foam. Take your time cutting here, and favour multiple passes with the knife rather than using too much pressure.
And finally, everything in its place
Pop the top layer of foam back in the jerry can, and each item should fit neatly in place. You can place it on a shelf in the garage with the door facing away; and nobody will be any the wiser. But really, this piece of handywork is best shown off when you’re hanging with mates in the shed.


*Important information* - Click here to read more about our DIY Advice Terms and Conditions.